

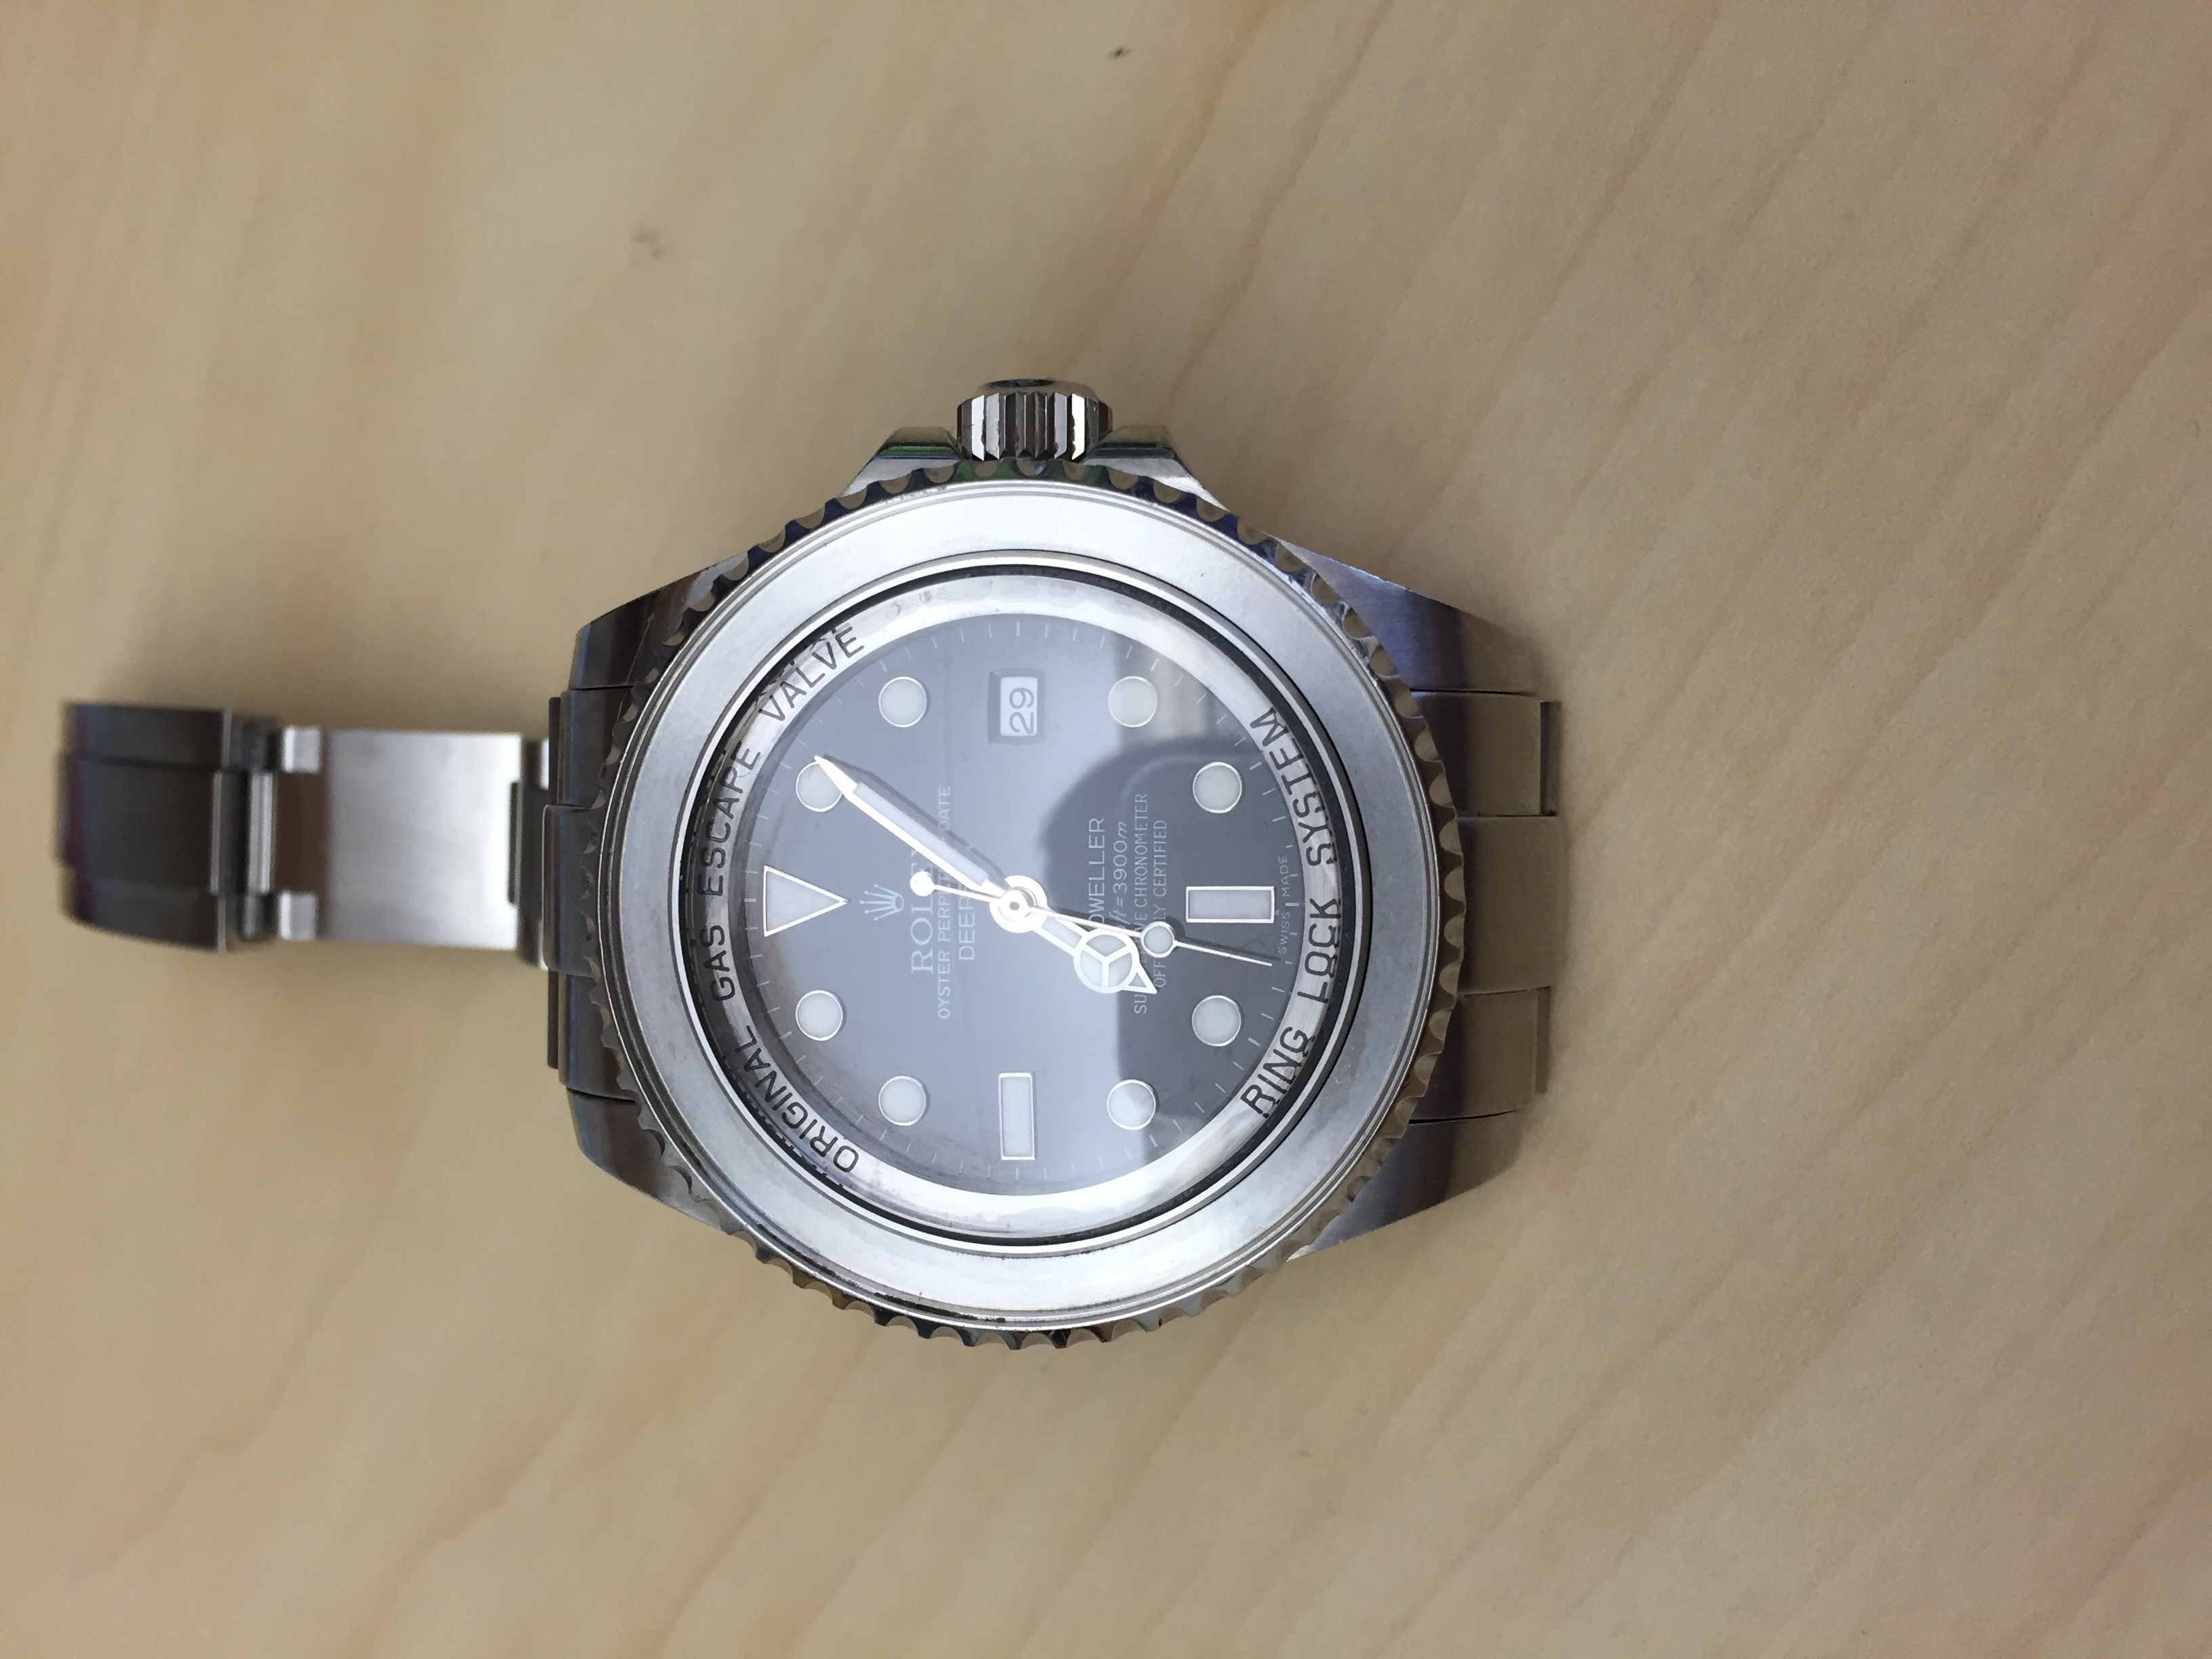
 Rolex DeepSea Sea Dweller is an iconic watch. Until it was superseeded by Deepsea Challenge it was the most water-resistant mechanical watch in the world. It is certified to 3.9km depth! One of the DeepSea Sea Dwellers has actually been on the bottom of the Marianna’s trench, on the outside of the submersible and lived to tell the tale.The construction is amazing. There is a back bowl of the watch made out of Titanium and the front crystal is 4mm thick. They both attach to an inner ring and when the pressure increases the seal between the crystal, the ring and the back-plate pushes them together to make an ever tighter fit.
Here is an exploded diagram of the DSSD (image downloaded from http://watchesbysjx.com/):
Even the bezel is looser than usually on the diver’s watches since the water pressure pushes it into the case and makes it operational at deeper depths.
It is a thick and heavy watch, but an iconic one. Rolex has since also made a DeepSea Challenge, certified to 12km depths, but that, arguably, is just overkill (as if the DSSD is not, I know 🙂 ).
A few weeks ago, I came across a listing of a replica Rolex DSSD on a forum. The seller specified that the watch was dead – it did not wind, but they said that probably the keyless works need seeing to. This was a 2014 Noob factory version. There are essentially two replica factories making diver’s Rolexes plus a handful of people (BK, TC and others) who make what is already a very good replica even better. The factories are called Noob and BP.
The name Noob comes from the abbreviation for Noobmariner (an entry level or “newbie” submariner with a 21j Chinese movement) and it was initially just a handful of people from China and Taiwan who started making boutique versions of Rolex replicas. They have since disbanded but a few of the people involved in the initial Noob production runs have started a mass operation, keeping the name. The operational characteristics of these replica makers are fascinating, but they are outside of the scope of this post. The interested parties can always check replica forums and find the in-depth “insights from the industry” there.
Noob Rolexes are pretty darn accurate and their characteristic is that they are pretty close to the genuine as far as the dimensions are concerned, meaning that those who are fanatical enough can swap replica parts for genuine without much (or any) machining to do. That carries its own problems with it – genuine parts are expensive. For example, the ceramic insert on the bezel (just a disc with numbers and pip at 12 o’clock is currently being sold on eBay for 500 pounds! Admittedly, the paint contains platinum, but still… The genuine crown just went for a little less than 100 pounds).
So, anyway, I came across this listing and after a brief exchange with the seller, I bought the watch for a very small amount of money. Ridiculously small. I haggled a bit too, just for the hell of it, as I was not planning on buying it in the first place and would do so only if the price was so low that it was a steal. So I had nothing to lose and thus haggled accordingly.
There were two disclosed issues with the watch:
- It did not wind.
- The insert pip fell out of the bezel and was lost (see photo at the top of this post).
There were also two undisclosed issues with the watch (which I did not complain about afterwards, because of the ludicrously low price):
- The lettering on the back was almost completely faded.
- The watch was insanely dirty. It looked like someone washed the watch in machine oil and then rolled it around in earwax.
I figured that this was what I had to do:
- Replace the pip on the bezel insert.
- Repair the movement or replace it, if it was beyond saving.
- Clean it up.
- Grease the seals.
- (Optionally) paint the back case with enamel paint.
Then once this was done:
- Regulate the movement.
- Check for water resistance.
All my divers and dress watches are swimming friendly as I want to be able to swim with them without a second thought. What is the point of a watch that is supposedly resistant to 4000m but dies if I splash water over it?
Anyway. Three days later the watch arrives. Until two years ago, I had one watch, that I wore at all times much to the changrin of my wife. I slept with it, showered with it, swam in the sea and in the pool with it. It has now been in my possession for about 25 years. It died last year and I restored it (the post is here). So, the watch was on my wrist 24/7 for 23 years. And it is not even close when it comes to shabbiness compared to the DSSD.
I first took off the bracelet and dunked it in 99% proof alcohol for 24 hours. There was black gunk oozing from it afterwards. At first I couldn’t even access the bars attaching the bracelet to the movement because there was so much gunk covering them.
I also opened up the case and checked the keyless works. The keyless works are the little cogs that go around the stem and allow the different positions of the crown to fulfil its designated functions (usually: 1st position – winding, 2nd position date set, 3rd position – time setting).
Here is a screenshot of the ETA 2836 / 2824 keyless works:

The keyless works are very fiddly. I have now rebuilt them several dozen times and it is always frustrating to do so. The cogs jump out of alignment and you either have to almost completely disassemble the back (which in watchmakers terms is called the top), or remove the hands, the dial, the calendar wheel and a plate that holds everything in place to get to them at the front. Not fun and every time you do it it is a lottery whether you will be able to reassemble the calendar side without scratching the dial or bending the hands. And then you need to reinsert the movement back into the case which means that the stem needs to be removed and re-inserted and the reinsertion and removal is usually the cause for problems in the first place. So, you reassemble everything, put the movement in the case and when you reinsert the stem, the keyless breaks again and you can spend another two hours redoing what you just did. It happens to me a lot. Too much, in fact. I just don’t get it how people manage to remove the stem and slide the movement into the case without dropping the movement. You need three hands for this. One to hold the movement with the dials pointing downwards, one to pull the stem out and one to push the button. I usually use my mouth to pull the stem out, but since I do not see the keyless works button, I tend to press it too hard. And I am screwed again.
UPDATE: I have now come up with a pretty good method. I screw the movement into the movement holder really tightly, turn it around and place it over the watch case. I then press the stem release gently (the black coded bergeon screwdriver is perfect fit for ETA 28xx movements) and tug the stem out, gently. If the movement is dislodged from the holder it slides into place in the watch anyway, so no harm done. If it doesn’t dislodge, I just do it the proper way – remove the movement, place it on a cushion and put the case over it, then turn.
The movement was fairly dirty and there was fine ruby dust on one of the bridges. That does not bode well. I also attempted to wind the watch and realised that it would actually wind but that the crown was slipping. Still, I replaced the barrel and the winding bridge, checked the keyless works which were fine, re-tightened the crown and wound the watch (which did work if I gripped the crown in a certain way). I then put it on a regulator and it was just horrific. It showed the accuracy at -489s per day and the amplitude could not even be detected when it was fully wound. The balance was stopping and starting. It was lethargic. This movement needs to be completely re-hauled. The dirt is interfering with the balance wheel and other wheels. I decided to just replace it, because the balance wheel is very hard to accurately re-seat without a microscope, which I do not have handily available.
I realised I would also probably need a new crown, preferably for a Noob 2014 edition, because I did not want to remove the crown tube if at all possible. So I corresponded with a boutique replica watchmaker and bought a new Noob DSSD crown from them. It is generally very hard to get branded parts for replica watches, as even in China these are illegal to produce.
So, I removed the movement and the hands, the dial, and the date wheel; and ordered a new movement – a clone of ETA 2836 – a Seagull ST2100. These Seagulls are brilliant. They are fairly inexpensive but come well oiled and regulated and the performance is on par with new ETA at a fraction of the cost. They are clones of ETA 2836, to the point where almost all parts are interchangeable. The ETA’s are now even more problematic because the factory is a part of the SWATCH group and in early 2016 the whole group stopped selling their movements to anyone but their authorised dealers (screwing the independent watchmakers too, not just the replica makers), which makes the available movements very expensive or in need of a service and very expensive, which does not help my situation. If I wanted to spend time on servicing the movement, I could service the one that came with the DSSD.
While I was waiting for the movement to arrive, I inspected the case. These cases have the helium release valve also called HEV (Helium Evacuation Valve). On the genuine watch this makes perfect sense, even though it is overkill (there are not many people in the world who would dive to depths requiring the HEV). The HEV is an automatic valve that releases the Helium that builds up in a watch when you dive to ridiculous depths and spend long periods under a diving bell. If there was no valve, the Helium would expand inside the case when returning to the surface and blow out the front crystal. Thus the HEV automatically engages and relieves the pressure (patented by Rolex and Doxa).
On a replica this is just pointless. No one in their right mind would go and actually dive with a replica, much less to ridiculous depths. These valves also need to be calibrated and lubricated. Replica makers usually don’t even lubricate the back gaskets, much less the HEV, and this makes the HEV the premiere point where the water rushes in when swimming. Therefore, what you do, in case you wanted to swim with a replica is to epoxy shut the valve. I tend to do this on all replicas that have the valve and the HEV is not purely cosmetic (sometimes the seating for the valve is not drilled all the way through the case. This is the case with many Breitling SuperOcean SteelFish replicas (at least in the one I have).
When I looked at the DSSD case when the movement was removed, it seemed to me that the HEV did not come completely through the case.
I attempted to remove the inner ring, but it seemed to be part of the case. I looked online and there were competing statements to that effect. Some people claimed it was machined as part of the case, some people claimed it was separate. Some Noob versions apparently had the ring removable, some not. Same thing with BP versions.
Hmm.
Well. I can start painting the back. I use enamel model paint. You need to cover the lettering, let it dry completely and then remove the excess paint with pegwood.
Here is what it looked like, when I got it:

I applied the paint:


I let it dry for a day and then used pegwood to remove the excess paint. The result is much improved, but not perfect (notice that the ‘=’ sign is not painted and that a few letter are not completely painted).

I repainted the problematic areas and will leave them to dry.

Back to the HEV issue.
Everyone agreed though, that even if the ring was removable, you need to get the crystal out first. And possibly the bezel. This is some work and you are prone to screw something up. You can break the crystal (well perhaps not in this case – it is half a centimeter thick), scratch the inner ring, break the insert, bend the bezel, incorrectly re-seat something etc. I figured I would see what can be done and if the movement still hasn’t arrived by then, I might attempt it. I would need to remove the crystal to get to the insert anyway and I would need to get to the insert in order to glue in a pip I ordered. So, the crystal will need to come out in any case probably, unless I am satisfied with gluing the pip in from the front, which might be problematic as I would then superglue the insert on the bezel ring and that may lead to all sorts of problems later (probably rending the bezel ring unmovable, depending on how the bezel is constructed. People were also saying that removing the bezel on the Noob is very hard.
I decided to first test the watch for water resistance as is, to see whether I need to epoxy the HEV shut at all. I also asked the seller whether he swam with the watch and he confirmed, so I was reasonably confident that it was not leaking. But I still tested it and it passed. See? No bubbles.

So I could just leave everything be. But that would bug me. I would know that HEV is an accident waiting to happen and would not be confident swimming with the watch, knowing that it might implode at any time. Also the movement was out already and I knew I would not be arsed later to do all this work once the watch was reassembled. And also the movement was very dirty and in need of a service. It was less than two years old (which is too short a period for that amount of dirt to accumulate), so it is possible that there was water ingress there previously and that destroyed the movement. Later, I looked at the stem and it seemed corroded, adding weight to this theory. If the water getting into the watch is not seawater, then the movement does not corrode, the oil just degrades more quickly and that might have led to the destruction of the rubies in the spindle seats, because they were not lubricated properly anymore (if they were lubricated in the first place).
OK, so it is settled. I will disassemble the case and seal the HEV shut.
I start by pushing out the crystal. I take great care to not touch the insert and use a plastic die size that grips the bezel, not the insert.

Remove the crystal (with the crystal press). Sides of the crystal are a bit dirty.

I then mark the ring position before removing it as I want to be able to align it easily when I am returning it (in the inside of the inner ring there is ROLEX ROLEX ROLEX engraving and I want it to align correctly – the Rolex crown at 12 and R at 3 and 9). I do not even touch the insert when removing the ring. Still I hear a crack. The insert shatters. I read on the forums how brittle they are, but this is ridiculous. No matter, at least I won’t have a problem with re-seating the pip. I’ll just buy a new after-market ceramic insert. I order one. It is a lot cheaper than the genuine one, but it still costs me as much as the whole watch did. Oh well.

Notice the hairs stuck in the bezel glue and the dirt? The hairs are not mine. Bleurgh.

I push the ring out and the bezel pops out with it too. I make sure not to lose any of the four spindles that provide the clicking motion.

I mix marine epoxy and fill the HEV hole. Once it is completely dry, I will sand it down further. It needs to be left alone for at least a day.


Here is the case completely disassembled.

In the meantime, I get the movement (an hour after disassembly and epoxying). Nice timing.
Here is the movement.


Nice Perlage. I can now start assembling.
First thing I need to do, is remove the winding disc as it otherwise interferes with the the position in the movement holder. You may be too lazy to do this. I certainly was once or twice, but that led to some difficulties later on – the movement does not sit nicely on the movement holder etc. It is one screw and if you neglect to remove it, you may bend the disc, destroy the fitting or similar.

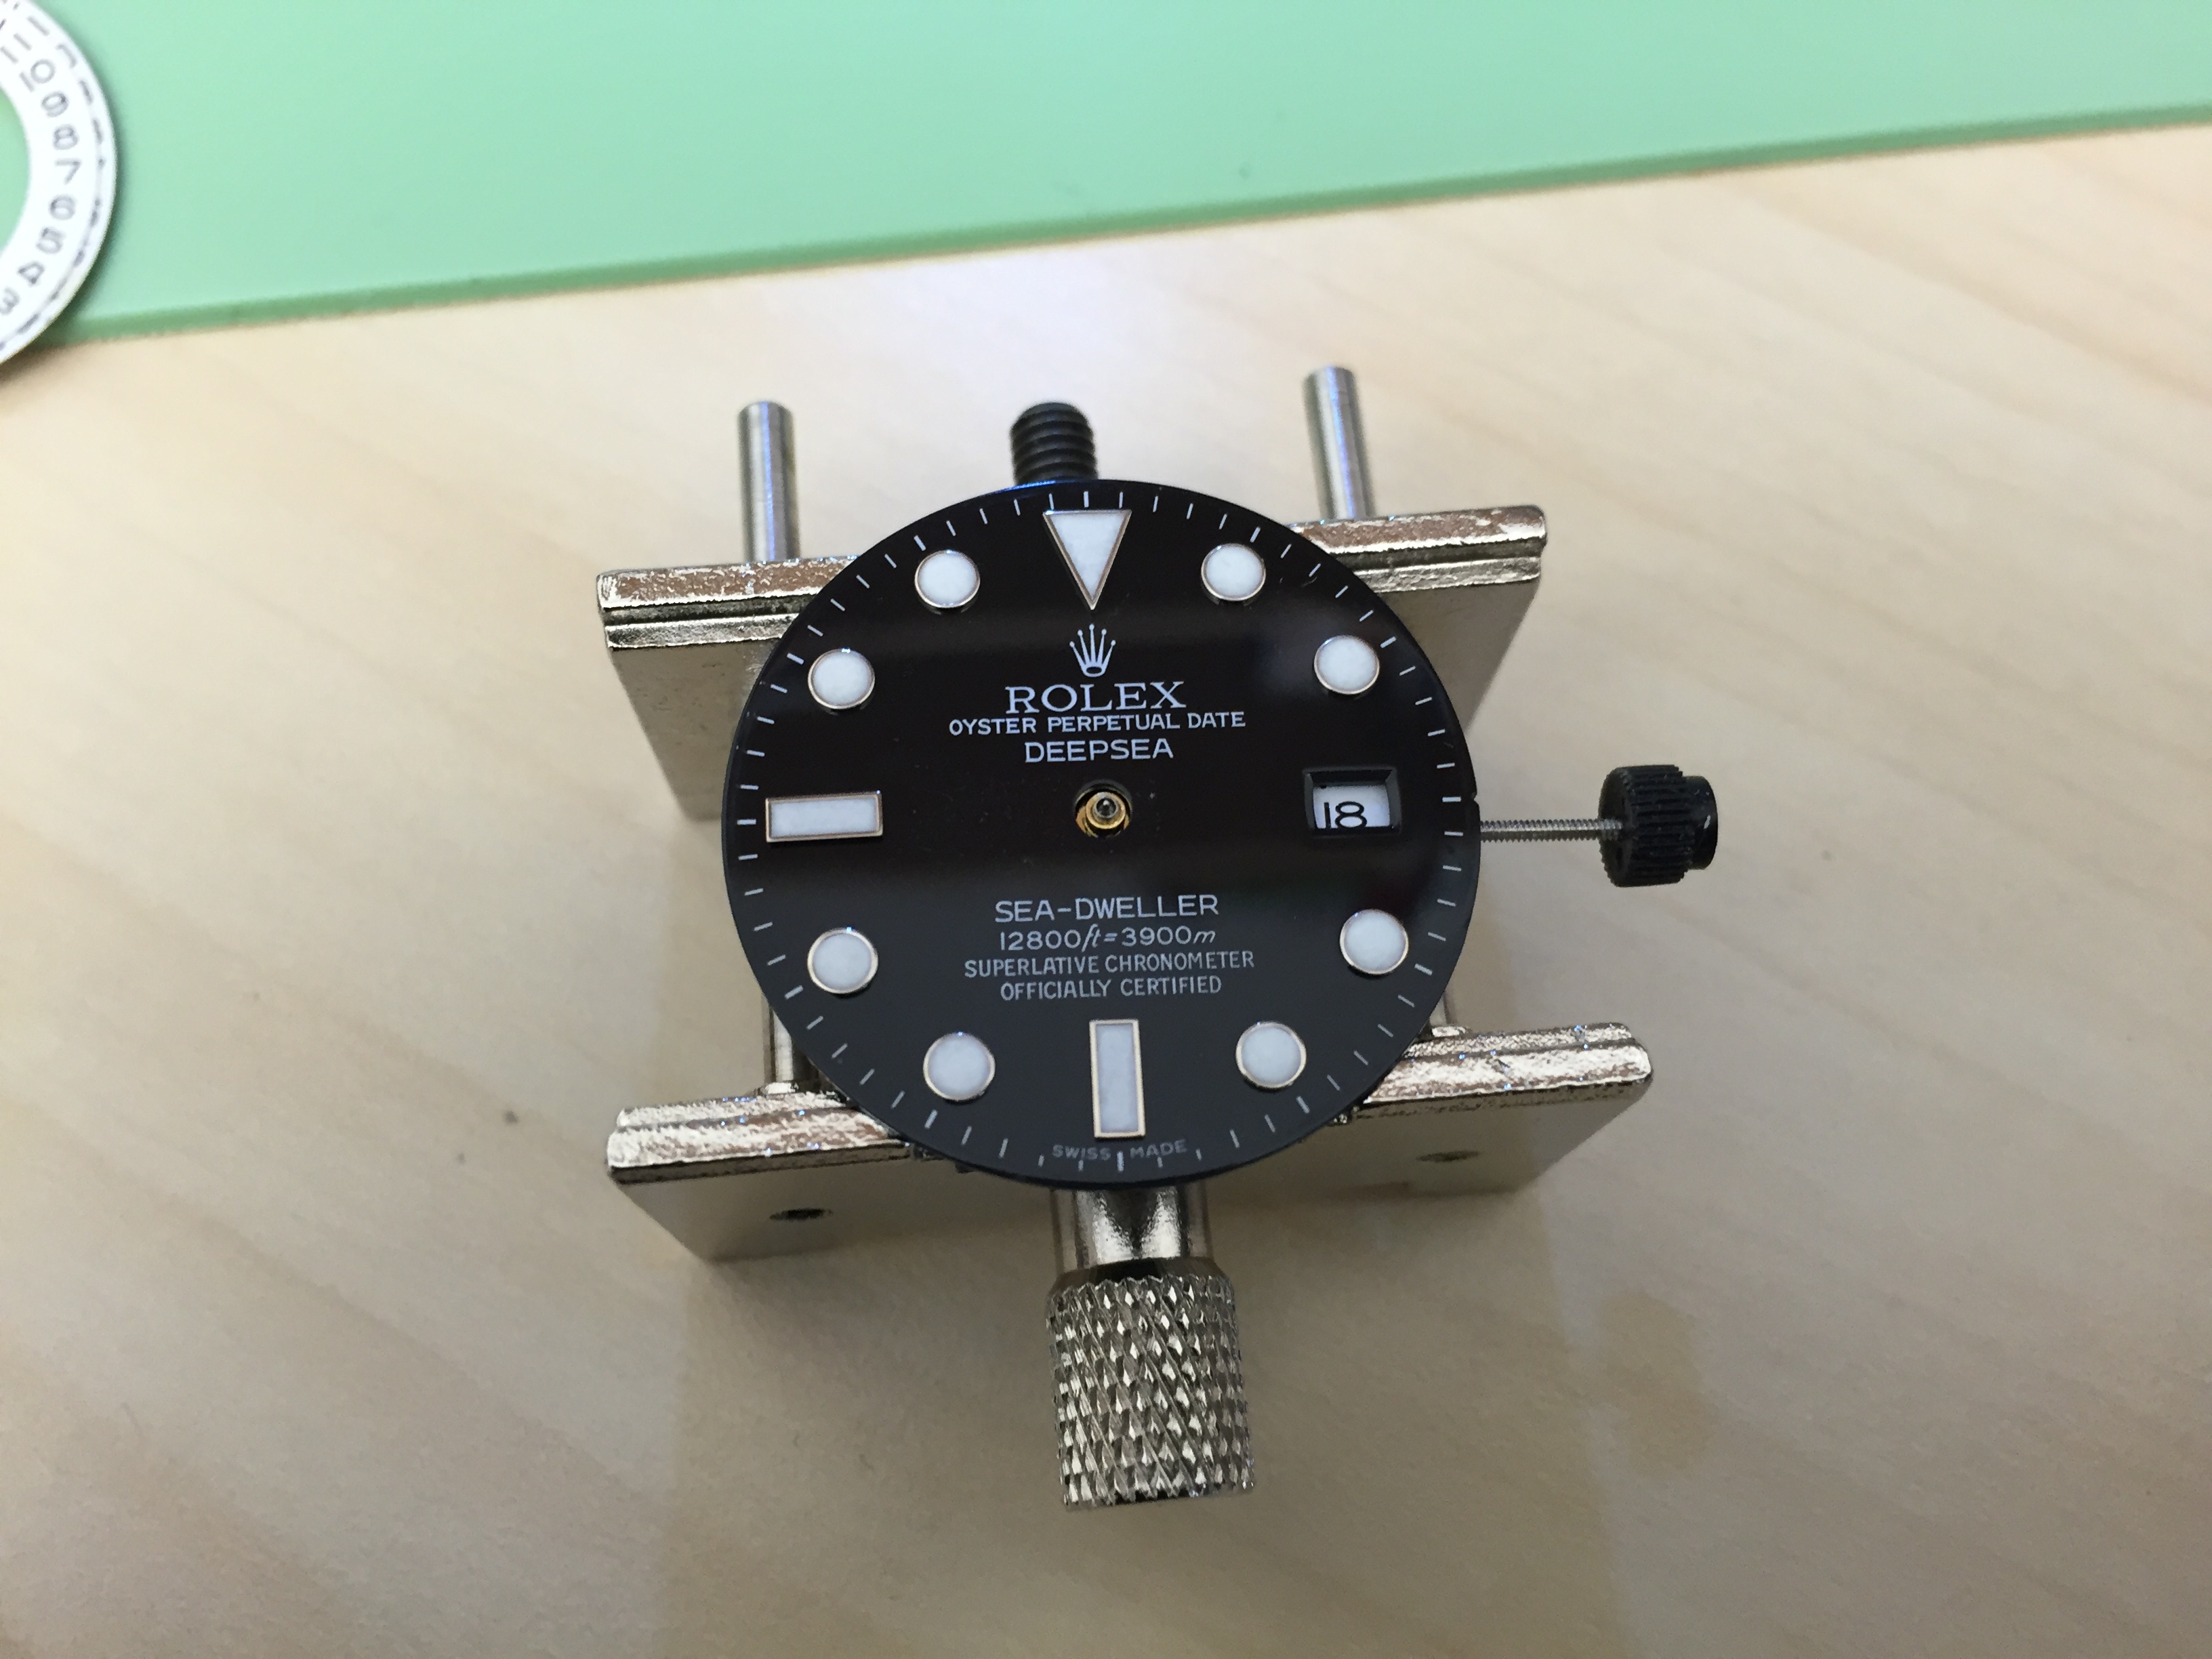
Then remove the hands, day and date wheels. And fit a Rolex-like one. Here is a photo of a wheel I that came with the watch (right), and one that I sourced from elsewhere (left). They are roughly the same, but the left one is more nicely done. I think I’ll use that one.

This is fairly fiddly business, but not to hard in the end. Here are youtube (video by rick914) pointers on how to do it.Takes about 20 minutes, but here it is, new date wheel fitted:

Then I need to check whether the alignment is ok. And it is just fine – the photo is at an angle, that is why this looks misaligned. I put on a dial.
Now the hour, minute and seconds markers:

Wind and let it rest. I will return to it, after I’ve seen to the case. I notice that I cannot set time anymore. I trace the problem back to a bent plate covering the keyless works (my fault entirely. I repair it and reassemble).
It is now two days later. The epoxy is dry and I need to first brush off the larger imperfections and then cover everything in silicone grease which will make the inner ring easier to slide in.

Now, insert the inner ring and align with my markers (I am using a crystal press for this).

Here it is from the front.

You see the four little holes? Springs and spindles go into those. And silicon grease. But first I need to grease the seal between the crystal and the white gasket. I decide against gluing the crystal in, as I might need to take it out at some point in the future. Grease should do fine. I put the crystal in (by hand, as there is a titanium ring that goes around it, locking it into place.

Then I put the silicone grease into the holes and add springs and spindles. There is one spindle on the bottom right that is of slightly different shape. Be sure to put it into the correct place and to align it correctly.

Now put on the titanium ring and the bezel. It is slightly fiddly, but I managed to get everything sitting correctly in the end. The bezel is in place but not too firmly. At first I pushed it too close to the case, which impeded it’s movement. I re-attached everything a few times and ended up with a secured, rolling bezel. There is a bit of silicone grease now on the rehaut, but I am not too bothered about it. Of course, it would be possible to remove it, but then I would have to go through the whole fiddly business again. And I cannot be bothered. Perhaps next time I will need to service the DSSD.

Since I have broken the ceramic bezel and am still waiting for the new one to arrive, I am pretty much done, for now with the front of of the case. So, let’s go back to the back side of the case.

Notice that I do not have the right crown installed, yet? That is because the crown that came with the movement was slipping and I needed to source a new one. I’ll set everything up with the old one, but then replace it, once it arrives.
So now the movement is back in the case. It is attached by a holder ring and then by washers. Before putting back the stem, I’ll need to slide in the holder ring.


Ok, now attach the automatic rotor and grease the back of the case. A plastic washer goes into between the back and the case.

Then for the fun of it close it up. First the case back.

Then the screw down part.

Then clean off the excess paint and end up with a fairly nice case back. The number 8 still needs to be retouched, I may do that at some point in time.

And here is the DSSD from the front:

Once I get the bezel and the crown, I’ll revisit it and update this post.
—–
Got the insert today. First thing that is needed is to press in the inner bezel ring.

Then add adhesive.

Then, press in. And align. I notice that on the photos it looks like the insert is higher than the crystal. That is not actually the case. The insert is flush with the crystal.


Now I only need the crown and then I can regulate and wear. I’ll update then.
UPDATE 1.
The Crown is in transit from the Airport now, but it seems it won’t arrive today. Well, I can still do some things.
- I’ve noticed that the date wheel does not want to jump all the way through on a date change.
- I also noticed a spec of of dust on the underside of the crystal
- Another thing is that the date now flips over at about 0:15 that is about 10 minutes longer than I like.
- I also need to test for water resistance now that I’ve completely disassembled the watch. I want to know whether I’ve put everything back correctly (the crystal seems to be a lot lower than it was originally).
- I need to regulate the movement (it is about 20s/d fast out of the box).
- And I still need to replace the crown.
So, I open up the DSSD again. This time it is fairly easy as I have received the correct size die (36.5mm) a few days ago. Because I have successfully ruined a few watches in the past by having their crystal blow out and the movement got soaked and parts subsequently rusted, I have now decided to remove the movement out of the case, and test without the movement. This is btw, the correct procedure anyway. It is a pain to remove the movement, but it is an even bigger pain to have to remove it afterwards and order new parts. So, since I need to remove the hands and dial to get to the calendar wheel and since I need to clean the underside of the crystal, I really have no choice.
I put the watch into the tester and it passes nicely. I realize I will need to retest with the new crown, but it is very unlikely that a properly lubricated crown would leak. See? No Bubbles. WR to 60m and probably a lot more, but I can certainly go swimming with it.

I then focus on the movement. I figure that the date wheel is bad. It could happen. So, I remove the hands and the dial and replace the date wheel. I have plenty of spare ones, because the Huanzghou 6460 GMT movement comes with a replica Rolex datewheel and I have about 6 of these movements merrily ticking away in several of my watches. The wheels are left over, as I, until recently, had no interest in Rolex replicas. So, I replace the wheel and also the ring that comes between the movement in the dial. I test (by putting the dial and the hour hand back on) and it is still sticking. Sigh. The new date does not show completely in the date window. I remove the hour hand again and release the levers holding the dial in place and the date jumps forward, perfectly aligned. Cool. That means that I only need a bit more clearance between the dial and the calendar. I test this several times, replace the washer that comes between the dial and the movement and voila. The date is now perfectly centered and advances correctly.
I also re-seat the hands and now the date flips over at 23:57. Good enough. I am not usually awake for this (or not awake in order to watch my watch flip dates), so it is a moot point anyway. But, I do that too. I then thoroughly clean the insides of the case with optical paper and lens cleaner. I lightly brush the dial with a lens brush. And re-seat the movement. Perfect. No dust anywhere. Now the only two things remaining are to regulate the movement and to replace the crown. I’ll do the crown when I get it. Probably not today. But I can certainly regulate.


Very good, overall. The amplitude is nothing to write home about, but the positional variation is not too bad. I am now almost done. Only the crown remains.


Update 2.
The crown arrived today. So, just the last stretch. Here is the package:

And here is the crown. A stem was attached to it, but while it was a 2824 stem, the Seagull ST2100 has a slightly different one.

I removed the one that came with the crown and inserted the one I trimmed already. They were the same length, but just different enough that the 2824 one wouldn’t seat correctly. I replaced the stems, inserted into the movement, greased the seals, screwed the back back on and attempted to wind. It works! We are finally done. One perfectly working DSSD 2014 Noob that is about 1 second fast every 3 days. 


Excellent post with fantastic detail and beautiful watch. I have a similar watch that needs a replacement movement. I just ordered a Seagull ST2100 thanks to you. Could you be so kind as to share where you found the date wheel? Thanks again!
Thank you, Tom for these kind words. In this instance I used the noob DW that was on the A2836 that came with the watch. Generally, with Rolexes, I use the dw’s that come with hangzhou 6460 (A2836 clone with GMT mods). For some reason they sell them with approximate rolex DW’s. I now have about six H6460’s in various states of repair and only two rolexes with GMT function. So, the DW’s are lying around until I need them. Every once in a while, you can also get overlays on rep forums or ebay. The really good overlays are about $15. Here is one link to a h6460: https://www.helenarou.com/hangzhou-6460-automatic-gmt-movement-date-at-300-eta-283646030028362.html.
The rolex ETA DW’s are slightly harder to install than regular ETA ones. I suggest you look at the following video for hints:
. It is not impossible, just fiddly. You soon get the hang of it.
Hope that helps,
David
The best step-by-step presentation on a Rolex restoration I have ever seen! I am so impressed with how much details you are sharing us.
– How exactly did you remove the crystal – did you just push it out from the back?
– How did you remove the inner ring – did you push it from the top going to the back?
– What size back opener did you use, Deepsea must be an extra large size.
– Also do you have this on tube?
I just bought an authentic and a replica 116660, with the authentic for daily use at work and replica for home use or the beach (don’t care if this gets scratched), but I’m looking at sealing the HEV on the replica like you did – I don’t have any problems yet. Any info is appreciated. Thank you very much!
San
Hi San,
Thank you for your kind words.
I am sorry, I am currently away on a skiing holiday – I’ll respond s quickly as I can when I return.
Kind Regards,
David
Hi San,
Now I have more time.
– I pushed the crystal up in a crystal press, but before removing the bezel, which resulted on me breaking the insert. Either (a) remove the bezel first (be very careful not to lose the springs used for the clicking action), or do what I did later – I used a laser cutter to create plastic washers that were higher than than the bezel and came around it so that there was no pressure on the bezel or insert when I was removing the crystal. I would suggest to use a vertical vise rather than the crystal press, because it gives you a lot more control when you are re-seating the crystal.
– The inner ring goes through the back, yes. Remove the crystal, use crystal press to push the ring from the front to the back. If you want to keep the exact positioning, then make a series of lines with a sharpie on the back across the case and ring. Then when you put it back in, just align the lines. It is easier to replace if you lubricate it when putting it back.
– The DSSD has a larger opener size than other rolexes, yes. If memory serves, it is 36.5mm (I just checked, yes it is, number 6 die, 36.50). I think I have mentioned it in the write-up. You can either use the cheap Chinese RLX openers, that can be resized, or buy the die. I initially opened it with the resizable opener, but then I bought the die to tighten it up. I bought an aftermarket one, it was not terribly expensive (like $40 or so).
– No videos, I am afraid.
To seal it up, just follow the guide. I use J-B weld marine epoxy. You will need to largely dissasemble the DSSD. Remove the stem, the screws keeping the mechanism in place, the mechanism, the crystal and bezel, push out the ring, and you will have access to the HeV. Then seal it, do the process in reverse, lubricating the crystal, crown and back gaskets, test for WR and then put in the mechanism and seal the back again. It should be fine, it was designed to withstand a lot more water pressure.
Kind Regards,
David
David – Thank you for sharing more details and providing me ideas to do it easier. I have the tools now and will follow the exact sequence and pointers you have mentioned. I will be using a marine epoxy to seal the HEV. Good point when you mentioned about putting a slight lube on the crustal and inner ring to make it easy. I believe by putting ultra-light automotive sealant you can watertight the watch way better than the factory. I look forward to doing this project. It will be an excellent watch for rugged use considering it’s a Rep so that my authentic one stays good. I tested this Rep for power and it stays on for approx 47 hours! Again, Thank You!
San
… or instead of the automotive sealant, why not just use the silicone watch lube? It costs like 10 EUR. I put the seals in the sealant box and use a paintbrush to lube the other parts (crown, ring, crystal gasket).
Hey Dave,
– How many feet did you water-test your watch? I know it doesn’t have to be 12.8k ft.
– I opened mine with the 36.5 mm and I can’t believe it was only hand-tight very loosely but water didn’t penetrate when soaked several times.
– Looks like my reply to your above answer did make it in this website, but I really appreciate all the additional details you have provided.
Thank you,
San
Hi San,
I have a WR60 proper tester. This is what I tested it for. I have no doubt it could go a lot deeper. I would not hesitate to dive with the watch. I did snorkel with it numerous times in the sea and wore it to the swimming pool too.
The previous reply did not make it, because I need to manually approve it 🙂 – there is a lot of spam I get hit with, so no automatic approval. It is there now.
Kind Regards,
David
Why do you take the deepea apart for when I bought mine it hw s a lifetime warranty at Geneva Switzerland they take care of my Deepsea for life
Ah, I see the problem here :). To put it bluntly, I took the DSSD apart, because Rolex would have destroyed it if they saw it :).
This is not a genuine Rolex, Paul. I hasten to add that in the UK, it is legal to own a replica, but not to resell it, so I am not breaking the law if I own a fake Rolex only if I try to flog it off.
I thought I made it clear that this was not a genuine watch. I suppose one could argue about its authenticity (not that I have any interest in doing so. I know it is not a genuine Rolex and I am fine with it). I spent many many hours working on this DSSD, therefore while it is not a genuine Rolex, it carries some intrinsic value for me.
I own both replicas and genuine watches – both have a place in my collection. I generally do not use an £8,000 watch (like one of the genuine Omegas that I own) when I am moving my lawn or when I go to 3rd world Countries. A replica works just fine then.
Kind Regards,
David
I suppose my Rolex will get old when I’m finished with it in 60 years or so if I’m alive and it will be scratched a little bit it will be worn to old and the back and front will be faded I’m say to my kids it’s been used by your father me Derham and hand it on ??
Hi David,
do you mind to give me some information about the Gen Rolex Crown for DSSD?
I would like to buy a gen crown for my DSSD but I’m not able to find a reference.
Hi Max,
I don’t know the reference number. The simplest solution is to go to a Rolex forum and ask. On rep forums there are sections that list part numbers for specific watches. I could go and find out, but so could you :).
This is the least of your worries, though. If your DSSD is genuine, then just go to an authorised dealer (AD) and have it replaced. If it is a replica, then you need to trawl the rep forums, until one becomes available (+ tube). If you have a DSSD with A2836, then it might not fit. Certainly the crown does not usually fit the rep tube. You need to check whether the rep tube is push fit or screw fit. The gen is screw fit. Then you need to check whether the opening is correct. You may need to drill a larger hole and you may need to cut in the screw-in groove. The position of the crown is at different heights for A2836 and 3135 reps. Then the crown guards might not fit and you might need to dremel and sand them. IDK.
I have never bought a genuine Rolex crown, as the price is really prohibitive – we are talking several hundred $, certainly about the price of the whole mid-tier replica. It might be cheaper at an AD, but not many AD’s will sell it to you under the table, as Rolex is really controlling about their parts – they check the amounts of sold parts year per year at each dealer and if there is a sudden spike, they come to investigate. If they suspect that the AD is selling Rolex parts on the grey market, they will revoke the AD’s license. In many cases they also require the defective part that needed replacing to be sent back to Rolex. So genuine parts for Rolex watches are fairly thin on the ground. It is not impossible, of course, but if memory serves, the last time I was looking at the genuine crown with the tube for a 116660 on a rep forum the price was $599. Now you need to ask yourself, is this worth it? If I was you, I would replace many other parts first, before replacing a crown on a rep Rolex. I would go for a 3135 first, genuine, if possible (about $2000), then dial ($1500), then hands (~$500), then crystal ($1500), then bezel insert (~$800-$1000), then crown. But for that kind of money, you might as well buy a used gen. Currently, I can find used gens on Chrono24 for about $8500 which is not much less than what you would pay for all of the parts and a high quality rep. It won’t cost you much more if at all, and you will never have the hassle of getting someone to service it. Up to you, of course.
Kind Regards,
David
Hi David …remarkable details on your post … you have Realy opened my eyes to the extent on Replicas! I’m looking at mine differently now ?!!
But any way .. were can I get a ceramic Bezel insert for a 51mm deap sea challenger please? Or it’s Replica? Do they have after market ceramic inserts or are the non Rolex parts not ceramic ??
You can get a rep ceramic bezel by:
(a) going to AliExpress or eBay and ordering one. They will be about $40.
(b) going to replica dealers and ask them whether they can get one for you. I have no idea what the price would be.
(c) going to replica watch forums and wait for a bezel to be listed. Pay whatever is asked.
You can get a gen ceramic bezel by going to
(a)rep watch forums and wait for one to be listed. Expect to pay $1000+
(b)going to rolex forums and wait for one to be listed. Expect to pay about the same amount.
Rep and gen bezels are both ceramic. The letters in the gen are platinum. On rep, not platinum :). I do not know whether you need to get the gen bezel too. I suppose it depends on your replica.
Hope this helps. Sorry for the late reply – I was on holidays.
Hi David, all… sorry for my late (very late) reply.
So, after a long research I have bought all that I need. My base is an ARF DSSD with SH3135, already have gen dial, gen hands and gen datewheel. Then I found from a local jeweller a gen bezel insert. To be honest the ARF bezel is fantastic, you can see differences only compared side by side to the gen.
Last month I have found a gen crown and a gen crystal from USA seller, hope in this way I will have a very good franken.
Thanks for your help
Max
Good luck! This must have cost you a mint.
Mate, fantastic write up!
I need to realign the OGEV inner bezel on my V6 DSSD, as the ‘E’ in Escape and ‘K’ of Lock are supposed to align perfectly with the 12 and 6 markers.. it’s one of the very few external tells on these great reps.. and your pics and tear down is really useful.
Hi Kurt,
Glad it helped. The DSSD is, I think, the only Rolex where you can turn the inner ring and thus the rehaut. That comes in quite handy for alignment :).
Kind Regards,
David